
Core stability exercises: if you want to improve your posture, prevent back pain and increase athletic performance, stability of the core is essential. This type of training works on the deep muscles that stabilise the spine and the pelvis, the ones that come into action an instant before you move. This guide gathers a complete core stability routine, movement by movement.
Core stability exercises are something different from traditional abdominal work. It is not about doing crunches, but about teaching the muscles to work together to stabilise the trunk: the centre of the body stays still so that arms and legs can push. It is the solid base on which every movement rests, from lifting a crate to changing direction on the pitch.
⚠ Important: read this before continuing
The exercises and advice in this article are general indications and may not suit your situation. Everyone has a unique clinical history: what works for others could be counterproductive for you.
Want a professional's opinion? Start with the questionnaire: you register and see who will follow you, a physiotherapist on the professional register chosen for your case, whom you write to in chat. If you prefer to hear a voice, the first consultation is free and we look at your situation together.
What the Core Is and Which Muscles Make It Up
Before looking at the routine, let us understand what core stability exercises work on. The core is the group of muscles that surround the trunk: abdominals, obliques, transversus abdominis, the pelvic floor muscles, diaphragm, multifidus, quadratus lumborum. They are all called into play together, not one at a time as in classic isolation exercises.
Transversus abdominis is the key muscle in this work. It is the deepest of the abdominal muscles and acts like a natural belt that tightens around the waist every time you move. The first goal, even before strength, is learning to activate it on command.
Multifidus matters above all when the problem is the back: these are small bundles of muscle running along the spine, which stabilise one vertebra on top of another. Strengthening them means working on the defence closest to where back pain originates.
The pelvic floor works in synergy with transversus: the two activate together, almost always without you noticing. The routine trains precisely this coordination, not the strength of any single muscle.
Why Train the Stability of the Centre of the Body
The first reason is back pain. A strong core protects the spine by distributing loads rather than always discharging them onto the same points: this is the most studied benefit of core stability exercises.
The second is posture. Trained stabilising muscles maintain correct alignment without you having to think about it, even after hours at a desk or standing.
An important point: before trying these exercises, make sure you have received a correct diagnosis. People often assume they have one problem, but the real cause of the pain is something else. Doing the wrong exercises can make the situation worse rather than better.
The third is athletic performance. Every movement of the body starts from the centre: if the trunk gives way, the force produced by the legs dissipates before it reaches where it is needed. Athletes of every sport benefit from it.
Then there is balance. Trunk stability is what keeps you upright when the ground changes or when someone bumps into you: it improves with consistent practice.
Finally, injury prevention. A stable centre allows safe movement even under load or when you are tired, which is precisely when technique tends to deteriorate.
Transversus Activation: The Starting Point
Activating transversus is the basis of everything else. Lying on your back with knees bent, breathe in normally. As you breathe out, draw the navel towards the spine without moving the pelvis. If the pelvis tilts or the back presses down into the floor, you are using other muscles.
At first the contraction should be light, barely there. Do not hold your breath, do not clench the glutes or the rectus abdominis: correct activation is subtle, almost imperceptible to look at from the outside.
Hold the activation for 10-15 seconds, then let go. Repeat several times, trying to breathe normally throughout: it is exactly this coordination between contraction and breath that you will need in all the movements that follow.
Practise transversus activation every day: you can also do it seated, lying on your side or at your desk. It is the base on which every progression is built, and without this mastery the advanced variants become much less effective.
Dead Bug: Anti-Extension Stability from Supine
The dead bug is one of the most effective movements in the routine. Lying on your back, arms pointing up, knees bent at 90 degrees. Activate transversus and keep the lower back on the floor: this is the starting position.
Slowly lower one arm and the opposite leg towards the floor. Keep the abdomen flat and the lower back stable: this is where the exercise is won, not in the range of movement.
Return to the starting position and repeat on the other side. What you are training is anti-extension stability, that is, the capacity not to let the back arch while the arms and legs move away from the centre.
To progress: extend the arms and legs further, slow the movement down, add pauses at the lowest point. Each variant increases the difficulty without changing the basic action.
Bird Dog: Control on All Fours
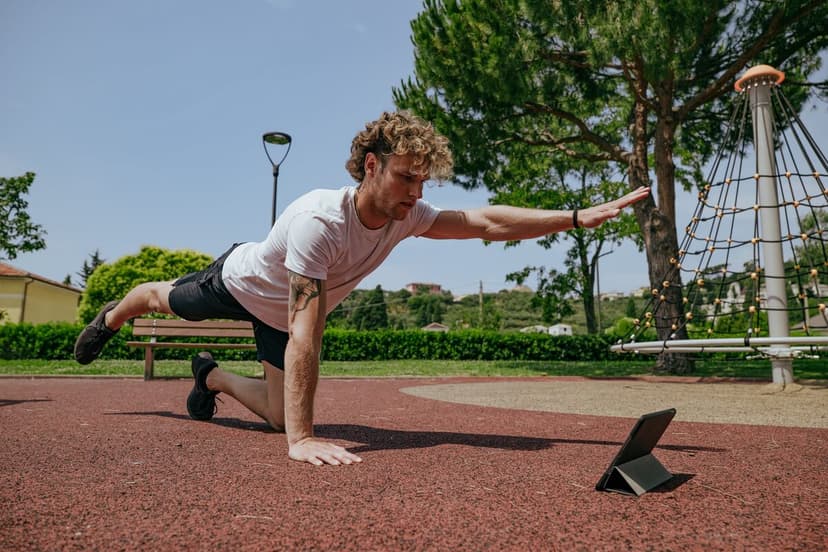
The bird dog is the other pillar of the routine. On all fours, hands under the shoulders, knees under the hips. Activate transversus while keeping the back neutral: this is where you start.
Extend one arm forward and the opposite leg backward. Keep the pelvis and back still, without rotating: control of the pelvis is the aim, not how high you can lift the limb.
Hold the position for a few seconds, then return and switch sides. What is being trained is stability on all fours, the same stability needed every time the body rests on one side only.
Variants: touch the opposite elbow and knee before extending, add a band, close your eyes to remove the visual reference. These are progressions of the same movement, not different exercises.
Plank: Resistance in Line, Without Collapsing
The plank is probably the best-known exercise of all. On the forearms and the toes, body in a straight line from head to heels. Activate transversus and hold the position while continuing to breathe.
Do not let the back arch or the pelvis rise to seek relief. The neutral position is everything: performed this way, the plank trains anti-extension endurance.
Start with short holds (20-30 seconds) and increase gradually. Quality matters more than duration: 30 perfect seconds are worth more than 2 minutes with the form falling apart.
Variants: side plank, single-leg plank, plank with shoulder tap. They increase the challenge by shifting weight or removing support points.
Bridge: Pelvis and Glutes Under Control
The bridge also involves the glutes, and this is what makes it useful in the routine. Lying on your back with knees bent, feet on the floor. Activate transversus, then contract the glutes and lift the pelvis.
Hold the position at the top for a few seconds before lowering. Do not seek height by arching the back: the aim is control, not how high you rise.
The single-leg bridge is the natural progression. Lift one extended leg and keep the pelvis level, without letting it drop on the free side: this is where stability is truly tested.
Pallof Press: Learning to Resist Rotation
The Pallof press is the reference for anti-rotation work. Standing side-on to a cable or a band, hold the handle at the chest. Push the arms forward while resisting the pull that tries to rotate you.
Hold the position with arms extended for a few seconds. The centre of the body works to prevent a rotation, not to produce a movement: it is a demand different from every other one in the routine.
It can be performed standing, kneeling or in a split stance, and each position takes away a little of the base of support. Anti-rotation remains the most neglected component of core stability exercises, even among people who have trained for years.
The Complete Routine, Session by Session
A core stability routine should last 15-20 minutes. This time is enough to train all the stability patterns, and repeating it regularly matters more than making it longer.
Begin every session with transversus activation: it is the specific warm-up that prepares the body for the more demanding movements that follow.
An effective sequence: dead bug (8-10 per side), bird dog (8-10 per side), plank (30-60 seconds), side plank (20-30 seconds per side), bridge (10-15 repetitions). This covers anti-extension, anti-rotation and pelvic control.
Repeat it 3-4 times a week: this is the frequency that gives the best results without overloading. The rest is done by consistency, week after week.
The Mistakes That Undermine the Routine
Holding your breath is the most common error. Breathing must continue even while transversus is active: if you have to stop breathing to hold the position, that position is still too hard for you.
The second error is using the wrong muscles. Clenching the glutes, hip flexors or rectus abdominis instead of transversus happens often and empties the work from the inside: here precision is worth more than effort.
The third is rushing. Master the basics before moving on to advanced variants: skipping steps reduces results instead of speeding them up.
Learning the Movements with Remote Rehabilitation
These movements are worth much more if someone watches you do them. A physiotherapist can teach you the correct activation, correct your form and personalise the progression for your case.
With Ri-Hub you can learn core stability exercises the right way from the start: the physiotherapist guides you on video, corrects in real time and builds the programme to measure.
A remote rehabilitation session costs 29,90 euros. An investment in building a strong and stable centre of the body: book a free consultation and set up your routine starting from where you really are.
You might also be interested in:
Anterior Cruciate Ligament: Injury, Symptoms, Rehabilitation and Return to Sport
Disc Protrusion: Is It Serious? What to Do and How to Treat It
Stay in touch with us
Join our dedicated Facebook group: we reply to all patients, give practical advice and clear up the most common doubts.
Sources
- Effect of Trunk-Focused Exercises on Pain, Disability, Quality of Life, and Trunk Physical Fitness in Low Back Pain and How Potential Effect Modifiers Modulate Their Effects: A Systematic Review With Meta-analyses, The Journal of orthopaedic and sports physical therapy, 2023
- Core Stability Exercise Versus General Exercise for Chronic Low Back Pain, Journal of athletic training, 2017
- A meta-analysis of core stability exercise versus general exercise for chronic low back pain, PloS one, 2012
Last source check: September 2026.
Core stability in physiotherapy: when it stops being training
The exercises on this page are training: you do them to feel better and to hold more. In physiotherapy the same movements play a different role: they are chosen according to what reproduces your pain and which positions calm it, and the progression is decided by the person assessing you, not by a table.
The practical difference is simply this: if you train your core and nothing else, this page is sufficient. If you train it because your back hurts, first you need to know where that pain comes from, because the same exercise can be helpful in one case and irritating in another.
Need a consultation?
Start with the questionnaire on Ri-Hub: a few questions about your case, you register, and you see who will follow you, a physiotherapist on the professional register whom you can write to in chat whenever you like. If you prefer to talk in person, the first consultation is free, lasts twenty minutes and commits you to nothing: you arrive having already read what you wrote, and together you decide whether and how to go on.